Suggestions, want to contribute or drop something? Contact @derberg:matrix.org on Matrix or derberg on Discord
Get Started
In this guide we will be customizing the looks of your Home and Sleep Menu. It will certainly not cover everything that you are able to customize, but this guide should give you an idea as to what extent you can personalize your device. If you would like to customize aspects of it that are not listed on here, I suggest checking out the documentation by Team homemenu.co
The following blocks are just general warnings; it is NOT dangerous to proceed.
The following downsides don't even exist for e.g. LayeredFS users!
Create/update your NAND backup! When making changes to your device, there is always the chance you will brick.
Editing the Home Menu is pretty safe and you can restore even without NAND backups but you should just do one anyways.
If you messed up, keep calm and look at the end of the guide or ask us. You will likely need no CTR transfer.
Having a custom Home Menu installed breaks system updates.
If you want to update your system, you will have to restore your Home Menu with a blank HomeMenu.cia first.
This guide mentions multiple methods on getting files onto your devices. For that reason and to keep legacy, the warnings are there.
Prerequisites:
The latest version of Home Menu Rebuilding Tool by DeKay (HMRT.bat for Windows) & schrmh (HMRT.sh for GNU/Linux).
The latest version of any hex editor like wxHexEditor
Get HMRT by either using git clone https://github.com/schrmh/HMRT/(recommended for update notifications; git setup)
OR open https://github.com/schrmh/HMRT/archive/refs/heads/master.zip and extract HMRT-master.zip.
(Note: If you use the Windows version (.bat): Press ENTER to solve "it doesn't generate files" problems.)
Download and install wxHexEditor (or other hex editors). If you choose wXHexEditor I recommend you to do this:
Enable "Bytes Per Line Limit" of 16 in Options
Enable "TAG Panel" and "Search Panel" in View
Download and extract the contents of MSBT.Editor.Reloaded.v0.9.8.rar
Download and install Cheat Engine
Download HME Positions by DeKay
Section II - Decompressing the HomeMenu.cia
In this section we will be dumping and decompressing your device-specific HomeMenu.cia in preparation for the editing process.
Make sure an SD Card is in your console
Start your device and hold START to enter GodMode9
Navigate to [1:] SYSNAND CTRNAND
Navigate to title
Navigate to 00040030
Navigate to the folder corresponding to your region (if unsure: it's displayed in the 3DS "System Settings" app):
JPN: 00008202
USA: 00008F02
EUR: 00009802
CHN: 0000A102
KOR: 0000A902
TWN: 0000B102
Navigate to content
Press (A) on the .tmd file → TMD file options... → Build CIA (standard)
Turn off your system and insert your SD card into your computer
Backup the .cia you just build from your SD card's gm9/out directory to a safe place on your computer
Rename the dumped .cia to HomeMenu.cia and place it to HMRT's main folder (next to HMRT.bat / HMRT.sh)
Launch the Home Menu Rebuilding Tool and choose step 1, then step 5
(Alternatively press 8 for a full, guided rebuild. This might be a bit inconvinient for LayeredFS users using HMRT.bat due to step 3)
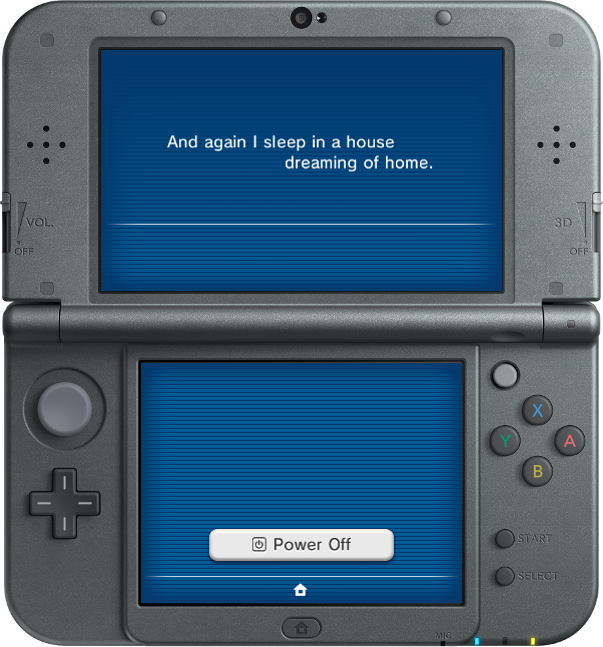
Section III - Editing the Sleep Menu
You can edit text and colors of the Sleep Menu.
The first six steps are for text editing; the rest
Launch MsbtEditor
Open /ExtractedRomFS/message/<Region of your device>_<Language of your device>/menu_msbt.LZ
This is where the text of the Sleep Menu will be located:
lau_b_shutdown
lau_press_pow_u0
lau_press_pow_u1
lau_press_pow0
lau_press_pow1
lau_press_pow2
lau_press_pow3
lau_press_pow4
lau_press_pow5
lau_press_pow5_flw
To change the text, choose one of the strings from the list on the left and edit the text in the top left box
You can change any other text that is unrelated to the Sleep Menu if you like
When you are done, save via File → Save and close the program
Launch your hex editor and open /ExtractedRomFS/sleep.LZ
These are the values you can modify:
Description
Bottom Screen
Top Screen
Background
0x1260
0x1CD4
Background Glow
0x1264
0x1CD8
Background Stripes
0x125C
0x1CD0
Header Color
-
0x1D70
Text Color
0x12FC
0x1DA4
Footer Color
0x122C
0x1EA8
Line Color
0x1554
0x1E24
Button Text Color
0x14D4
-
Button Text Mask
0x14A0
-
Button Color
0x132C and 0x13E4
-
Button Glow
0x1330 and 0x13E8
-
To jump to a value without looking for it manually, press Ctrl+G and enter everything from the Hex offset value excluding0x
(If your hex editor complaints, try add zeros in front until you got e.g. 6 or 8 digits. wxHexEditor for example jumps to the end if more digits than displayed on the left Offset pane are entered.
Speaking of wxHexEditors Offset pane: if you don't see h at each line within that pane, left click it)
Each of these values are made up from 4 bytes. For color values, you will usually want to edit the first three of those.
In case of values for color the 4 bytes represent RGBA (Red Green Blue Alpha)
(however it looks like changing alpha leads so some unexpected results in some cases).
RGB(A) can be represented in different ways. We usually use hex triplets.
Those are denoted by a leading # symbol.
E.g. — taken from the image; sleep menu top screen background color (fun fact: strings like P_Bg_D_00 help to identify a bit) — #464646 (commonly leaving out the byte for alpha at the end).
A different representation for those — that we don't use however — are RGB triplets.
Those contain commas as separators. E.g. (70, 70, 70) represents the same color as our previous hex triplet.
After you are done replacing the hex values with the colors you desire, save
Section IV - Editing the Home Menu applets
In this section we will edit the Home Menu applets (Notes; Friends; Notifications; Internet; Miiverse)
These are small icons permanently visible on the touchscreen while in the main screen of the Home Menu.
Some Home Menu versions don't feature all applets as some were introduced later. And KOR never got the Miiverse.
For now, this section only has a brief tutorial for colors; our community chats have info on how to replace images (bclim)!
Start off by opening /ExtractedRomFS/launcher.LZ in your hex editor
The values you can modify are on these addresses:
Icon
Color 1
Color 2
Miiverse
0x31DA8
0x31DAC
Internet Browser
0x31E84
0x31E88
Notifications
0x31F60
0x31F64
Friend List
0x3203C
0x32040
Game Notes
0x32118
0x3211C
Just as before, each value consists of 3 Bytes for color and one for alpha.
After you are done making your edits, save
Continue if you want to edit banners displayed at the top screen when a applet is selected
(feel free to close your hex editor if you don't care)
Launch Cheat Engine and open the file /ExtractedRomFS/hud.LZ
If an error occurs, just press okay and continue
Drag & drop the HME_Positions_By_DeKay.CT in the Cheat Engine window
You can now edit the color- and position values of elements as you please
Small CE beginner editing tutorial:
3.0 You do not care about Adress and Type column & the "Change Color" entry does not change the color value you care about.
3.1 Tick [X] the checkboxes until you see values
3.2 Double click on the value, "Change Value" window should pop up. Enter your value, click OK
3.3 Tick [X] the rows with the values you changed to save them.
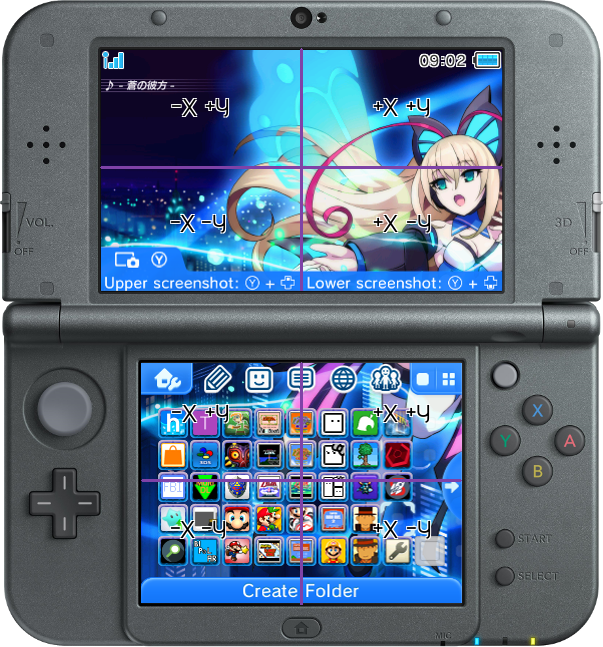
Colors are standard RGB format; for the coordinates please refer to this image:
Example: step counter moved from its original coordinate position (-58|+120) to (-196|+88) — now below the left connection bar:
X and Y values of text is relative to the image coordinates it belongs to
If you want to remove an element, you can edit the position values of the corresponding element to a very high number
This does not work for the connection status bar. If you want to remove it, open hud.LZ in your hex editor instead of Cheat Engine and change the following offsets to 00: 0x97E2 0x98A2 0x9962
32-bit floating point values consist of 4 Bytes. When it comes to the 3DS the first two are (hopefully) always 00 00.
Some mentioned addresses might skip a few unecessary bytes, take care when editing that it fits to what this bullet points says.
(Dungeonfire's original guide said in this part of this section to only edit one byte pair).
This tool can also help you to find coordinates (requires JS):
(Fun fact: Hex values from this tool can be searched in a Hex editor by using e.g. Ctrl+F — leave out spaces)
When you are done editing the values, check the box of each one you edited, save via Ctrl+Shift+S and close Cheat Engine
Section VI - Getting the changes onto your device
In this section we will perform steps to get a modified files on either a real 3DS or an emulator.
Choose one method by clicking on the tab:
This part will teach you how to rebuild, encrypt, and install the .cia file on a real 3DS.
There is a risk of softbricking but you can easily recover.
Return to the Home Menu Rebuilding Tool window and press any key to rebuild the .cia
If you accidentally closed the prompt, open it up again and press 6 → 2 → 3
Move the HomeMenu_edited.cia to your SD Card
Remove the SD Card from your computer and insert it into your device
Start your device and hold START to enter GodMode9
Press (A) on HomeMenu_edited.cia → CIA image options → Encrypt file (...) → Encrypt inplace
Restart your device and install the encrypted.cia file with your favorite .cia installer. If no error occurs, reset your device manually
You should now have your custom Home Menu installed!
This part will teach you how to overlay edited files on a real 3DS.
There is no bricking risk; no files on the device are really touched.
If you have issues, you can just remove the overlayed files.
You can learn more about Luma3DS game patching.
Press 6 within HMRT
If you went with "Full Rebuild" within HMRT, which includes cleaning (step 3) at the end, don't continue with this procedure and instead open HMRT new to do this step. Clean manually later
Copy edited files from the ExtractedRomFS folder (from HMRT's directory).
Place them into one of these paths on your SD card, depending on your region:
JPN: luma/titles/0004003000008202/romfs
USA: luma/titles/0004003000008F02/romfs
EUR: luma/titles/0004003000009802/romfs
CHN: luma/titles/000400300000A102/romfs
KOR: luma/titles/000400300000A902/romfs
TWN: luma/titles/000400300000B102/romfs
Create paths not existing, including further subfolders within romfs when copying files from ExtractedRomFS subfolders.
However, if the luma folder doesn't exist, make sure you actually have Luma3DS installed...
For code.bin patches (ExtractedExeFS), place them next to the romfs folder
Remove the SD Card from your computer and insert it into your device
Start your device and hold SELECT to enter the Luma3DS configuration screen
Press (A) on ( ) Enable game patching to tick it (x)
Restart your device
You should now notice that your Home Menu looks edited!
In case you can't see tab content: Legacy version of this step
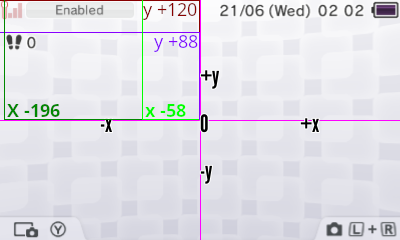
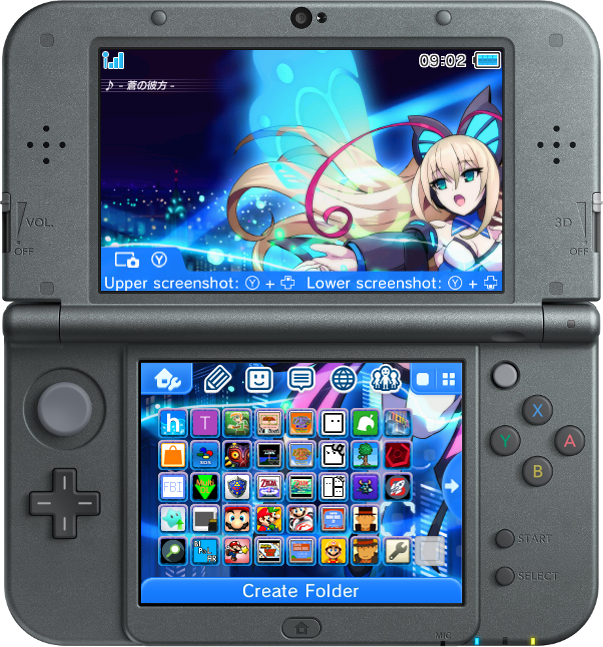
Here a few pictures of what Dungeonfire's Home Menu looked like:
(This is almost entirely copied from Zyneros' Home Menu theme, because Dungenfire actually really liked it)
Restoring the Home Menu without a backup (if the CIA got replaced)
This section is for those who forgot to backup their original HomeMenu.cia and want to update their system.
Extract and launch 3DNUS and enter the title ID and version of your Home Menu
If you don't know the title ID and version of your Home Menu:
Credit goes to:
● Dungeonfire for the previous guide
● DeKay for some of the files
● Minimal Mistakes since Dungeonfire blatantly stole some of their CSS (will remove/change upon request!)
● homemenu.co (likely down forever)
● Traiver, Romulator, DeKay, and everyone who contributed to the documentation
● Zyneros because Dungeonfire used his guide as a template
● ScribbL, Sobliv, Romulator, and Ms. Ferreira for their proofreading of the old guide
● Merch for their suggestion to use GodMode9 to dump the HomeMenu.cia ourselves instead of downloading it via 3DNUS
● The Custom Home Menu Asset Discussion Discord guild for the great help.
● Especially Sven64 and LegitMagic for contributing valuable knowledge and files.
● Kazue Ch. for a upcoming video.
Ways to donate something:
● https://www.patreon.com/derberg
● https://gbatemp.net/conversations/add with recipient schrmh
● https://matrix.to/#/@derberg:matrix.org
● derberg on Discord
● kazuepenguin (←put this in front of @gmail.com and send a mail)
● 🇩🇪-only affiliate programs for sites that give you some amount back when you do contracts / buy something.
(They also grant me money if you use them. Depending on what you use, you might get heavily tracked!...):
Check24: Energy, Internet, Mobile internet (if you need <3GB rather use FreePhone by GMX), Car rental (Germany has a 58 € / month nation wide public transport ticket!)
TopCashback's "Freunde werben Freunde" program
Shoop's "Freunde werben Freunde" program (best sign-up time usually around valentine)
Those are just some of many.
Drop whatever you like (for example paysafecard, gift cards)...
I might setup more ways to donate if asked.